Friday, August 31, 2012

Hubbard Valley Park - Seville, OH 8-26-12

 Over the weekend, we went on a nice family hike at Hubbard Valley Park in Seville, Ohio.  This was our first visit to this park, and what brought us there was a special program the Medina County Park System has, called the "Natural History Mystery Quest."  It's similar to geocaching only instead of coordinates, there are simple rhyming clues that you can print out online and you follow them until you find a hidden cache box.  Inside are small trinkets left behind by previous hikers, a log book to document who was there, and stickers to add to your quest form to prove you completed the quest.  There are six quests at different parks, and if you complete them all, you turn in the sheet and receive a small reward (not sure what).  We've done two so far (we did another one with friends awhile back), and I'm planning for us to do the other four, in addition to the Summit County Metro Parks' Fall Hiking Spree, which consists of eight hikes.  So we've got a lot of walkin' ahead of us this fall!

I really liked this park.  It had a nice playground, a fishing area, lovely views along the top of the dam, and lots of shady forest areas too.  Definitely worth a return trip sometime.

So, here are the quest clues:

Take the path that heads south; my directions, please trust.
Pass two little houses. Stop if you must.
On the path, up a hill. Read the sign. Learn a lot.
Years ago, lots of rain. Damage. Floods. We must stop!

Now here in the valley where Hubbard Creek flows
A flood control structure protects cities below.
The lake that was formed is a good fishin’ hole.
Bring a pole but no license? To the pokey you’ll go.

Stay the course on the dam. You’ll get quite a view,
Of the lake and the spillway, Buffalo Creek Retreat, too.
Take a look at that bridge, an unusual spot.
Rescued from Sandusky, so scrap it was not.

Now here’s where our trail takes a turn to the right.
Wind your way to the ridge top. Get a view from this height.
Cross small streams, dry in summer. In spring, they will flow. 
Carving channels, cutting down to the valley below.
 
At the top of the hill, a trail marker you’ll pass.
Destination ahead. Now don’t go too fast.
The path curves to the left. Find the key landmark.
Two trees close together with deeply grooved bark.

Up ahead just a bit, fallen trees you will see.
Look around by the small one. Then shout with glee.
But a warning my friends, if you pass the bench by.
Turn around. You’re too far. And again you must try.

This clue might be helpful, the cache site you’ll find.
Seventy-five paces from the trail marker behind.
Now with quest in hand, stay on the loop trail.
Back to the beginning, you’ll walk without fail.

Bug riding on Daddy's shoulders as we trekked across the top of the dam.

The cool old bridge rescued from Sandusky, Ohio and brought here, that was mentioned in the clues.

The view looking across the lake from the top of the dam.  This pic doesn't really do it justice though.

We succeeded in finding the cache box after walking a little ways through the woods, but I forgot to take a picture of it.  After that, we continued on through the woods and made a few other interesting discoveries:

Interesting tree we saw with a hole in it.

Most romantic tree EVER!!!

Monkey tried climbing this slightly sideways tree.

After our hike, the boys played baseball in the field near the parking lot, while I surreptitiously watched the professional photo shoot of a cute baby (perhaps her 1-year shots?).  She is the white dot in the background to the right of my husband.  You can't see much but I bet those pics turned out amazing!

Me & Bug

My guys

Family self-portrait!

Wednesday, August 29, 2012

Greater Cleveland Aquarium - May 29, 2012


Ok, here's the last forgotten old post from my drafts folder.  We went to the new Greater Cleveland Aquarium back in May.  I totally thought I had posted this but I guess I hadn't.  It was very nice, and the kids really liked it, but we were in and out of there in about an hour.  For the steep cost of admission, I would have expected a full day's entertainment, but we're still glad we checked it out.  Probably won't become regular visitors though, unless we have free tickets fall into our laps or something.  We came with friends but we barely got to socialize with them because the boys were constantly running off ahead to see the next exciting thing...


You begin in the freshwater section.  There was a man roaming around in the costume and character of a ship's captain - I thought he was rather entertaining, although some might find him a little on the cheesy side.  (Sorry I didn't get any pics of him.)

Bug says "Hi fishies!"  He was quite fascinated by them.

Alligators.  Bug says: "He's gonna bite youuuu!"

Lobstrosities in an overhead tank.  (Bonus points if you get my "lobstrosities" reference.)

Checking out the "Nemo" fish in a saltwater tank.


I dig anemones.  Not sure why, I just do.


I really dug these old arched brick hallways - I thought it was nice that they saved a bit of the flavor of the original building.

Hey!  I captured a brief moment where we were actually in the same place as our friends.  Hi, friends!

Pretty shiny fishies (I forget what kind)

Rays and sharks in the touch tank


Bug touched one, but Monkey changed his mind at the last minute and decided he'd rather not.

The BIG tank at the end

Cool underwater tunnel

We came all this way to check out the aquatic life, and what did the boys find most interesting?  The humans in scuba gear, cleaning the tank!

Tuesday, August 28, 2012

MonsterPianos! - March 25, 2012

Here's another crusty old post that had been sitting in my drafts folder forever and got forgotten when I was catching up awhile back...

So, waaaaaay back in March, Monkey and I went on sort of a "date", just the two of us, to an annual concert called MonsterPianos at E.J. Thomas Performing Arts Hall.  It featured "Eight 9-foot grand pianos, with as many as 24 pianists playing simultaneously."  I thought he'd either be totally into it, or he'd get bored and not be able to sit through the whole concert, in which case we'd just leave early.  He loves music and I wanted to at least give him a chance to be exposed to something cool, but I was prepared to go with Plan B if it wasn't his thing.  He liked the music, but got pretty squirmy and chatty before it was quite halfway over... so in consideration of the other concertgoers, we left.  The trip was NOT a bust though!  We ended up exploring the concert hall, inside and out, and we had a blast!  First, we wandered around and counted the huge counterweights that hold up the adjustable acoustic ceiling tiles inside the auditorium.  Yup, there were 27, just like the info section in our program said.


Next, we headed outside and explored the surrounding areas.  Since we live out in the country, walking along the streets in the "big city" was kind of a special treat.  We heard a train passing nearby and sprinted over to a bridge to get a look at it, and watched while it passed directly underneath us.  Then we walked over to examine an interesting and unique sculpture that I'd only seen from a distance... 

  
Huge glass sculpture by the famous Dale Chihuly.  I assure you, Monkey thought it was really neat.  He just wasn't in the mood for a photo op at that moment...
There were a few smaller sculptures in the area which I had never noticed before, even though I'd driven past them many times.  We checked them out, and then came across a group of musicians practicing just outside the building next door to the concert hall and we listened to them for a few minutes.  Finally, we meandered back to our car in the parking deck, and then headed to get a bite to eat at Swenson's (if you ever come to the Akron, Ohio area, you MUST go there.) before going home.

This outing could have easily ended badly... at first, I was disappointed to be leaving the show early, but it was a case of having realistic expectations for a 6-year-old boy.  I went in knowing that we might not make it through the whole show, and that was okay.  Our explorations afterward made the trip totally worth it.  

Monday, August 27, 2012

Organizational Idea - "Places to Go and Things to Do" Binder


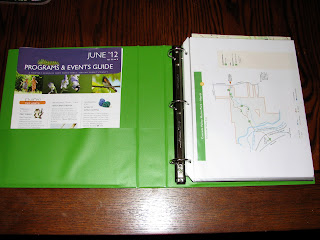
I took these pics awhile back but just noticed I forgot to finish/publish this post.  Just wanted to share something I came up with to organize all of my information about places I want to go (and places I want to go back to).  I printed out park maps & info sheets of all of the metro parks, museums, zoos, etc. that we plan to visit in the upcoming year - and put them into sheet protectors, so all I have to do when we're heading out is grab the page I need out of the book and take it with me.  In the front pocket, I keep current programs & events guides for various park systems, metropolitan areas, our local library, etc., so I can go through them at the beginning of each month and pick out things for us to do.  When I see something that looks promising, I write it on my wall calendar so I don't forget about it.

And yes, this idea was totally inspired by all of the organizational-binder-type ideas I've seen around Pinterest, although I've not yet seen one with this particular purpose.

Yeah, I know that says June.  It was current when I took the picture, I just forgot about it till now.


In the back are more maps, brochures, and events guides that I have picked up on our excursions (I LOVE those giant displays of random travel information that you come across at certain tourist places!) to give me ideas for future field trips.  If you look at your local area through the eyes of a tourist, you'll be amazed at all the things you discover that you never noticed before.

PS.  I have since added dividers to further organize by geographical area and type of attraction but I'm too lazy to go take more pictures.  So just use your imagination, k?

Thursday, August 23, 2012

It's Official! or, Not Back to School 2012

My response to all of the back-to-school photos everyone is posting on Facebook.  I think I'll do this every year.


Ok, I know I've been writing about homeschooling for almost 2 years on this blog, but I have now sent in our first legal home schooling notification letter... and we received our excusal letter in the mail from the school district yesterday.  Now it is legal and official and real!


In Ohio, the rules are that you must notify the school district in writing of your intent to homeschool, confirm that you will teach the required subjects, that you will provide the required minimum number of hours of instruction for the year, and that you are qualified to do so (high school diploma or equivalent).  You are also required to provide a "brief outline of intended curriculum for the year" and a "list of textbooks, correspondence courses, commercial curricula and other basic teaching materials parent intends to use".  Here's where it gets tricky:  both the outline and the list are for "informational purposes only" and the school district is not supposed to make judgements about them, it's just to show that you have some kind of plan.  But I've heard stories of districts demanding extra information from people, things that the parents are under no legal obligation to provide.  Some districts don't seem to understand that under the law, we are notifying them, not applying for permission.  But you do still need that all-important excusal letter from the district to prove that you're kosher.  Everything I've read about notifying says that you should give them the very minimum information that is required and nothing more, to avoid setting a precedent and causing problems for other families.  So it's a delicate balance of being thorough enough, but not giving any more information than you have to.  For me, the anxiety level of "needing to get this just right" was slightly higher than writing a resume.  I was surprised though, to find that the process was actually a bit helpful, in making me sit down and compose a formal (if still rather loose) plan for the year.  It was especially tough because we are pretty eclectic and child-led, so we don't know what books we will be reading until the topic comes up and we start researching whatever it may be. 

I've seen other people posting their notification letters online in some of the homeschooling groups I belong to, so other people can use them as examples.  So, in case anyone else finds it helpful, here's my actual outline:

(I couldn't get it to format right by copying/pasting, so I just took screenshots directly from Word.  Click the images to see higher-res versions.)


For my list of materials I included: the local library, metro parks, museums, homeschool co-op classes (more on that in a minute), board games and other educational toys, online games, and documentaries/television programs.  The only specific books/curriculae I mentioned by title were Math-U-See, Story of the World Vol. 1, Bob Books, and Usborne's First Reading set.  I did mention a few specific local museums and a few specific websites we'll use, but that's it.

Since yesterday was the first day of school for our area, and we happened to receive our excusal letter that day as well, I wanted to do something special to celebrate the day - however, my motivation was dampened by the fact that Bug woke up with his first-ever stomach virus in the wee hours of the morning, so most of my attention was devoted to him instead.  I did take a moment to feel very grateful that I was not dealing with one vomiting kid AND trying to get the other kid ready and out the door for his first day of school at the same time.  It really is lovely to be able to go with the flow and live by our own schedule!

Oh, and the homeschool co-op I mentioned?  There's a new one that has just formed not far from where we live, and we are going to give it a try.  It's an inclusive group with people of multiple faiths and I think there may even be a few like myself who do not practice any faith at all, so I think it will be a much more comfortable fit than the rest of the (fundamentalist) options around here.  I'm excited about it but also incredibly nervous as well.  Since it's a co-op, all parents are required to work in some capacity, and although I tried signing up for the option of being a permanent member of the cleanup crew instead of teaching, I was recently asked to replace one of the co-teachers of the Astronomy class, and I said yes.  For some reason I feel totally capable and qualified to teach my own kids, but I'm sort of terrified of teaching other kids.  But I *do* love Astronomy, and it makes sense... and I'm no good at saying "no"... so, yes.  That's happening.  Will keep you updated on how that goes!

In other news:

Monkey got glasses!  And he digs 'em!

Bug "Pities da fool."  At least he did, before he got sick.  Now he's just pitiful.


We got a new family member.  Meet Parker the fish!

Bug giving me his adorable/ornery grin, before he was overrun by cooties.


Friday, August 17, 2012

A Worthy Cause

A friend of mine is participating in a charity event called Extra Life, which benefits children's hospitals around the country, and I would like to share his request for support.  You can read his story, in his own words, here.  The tl/dr would probably read:  "Newborn son had open heart surgery on Christmas Eve at 4 days old.  Baby now thriving, in large part due to amazing people at Akron Children's Hospital.  Dad now wants to give back a little."  But seriously, click that link and read his heartwrenching post, and then click through the link at the end of it to donate a little bit to support this very worthy cause.  Or if you like, just click here to go straight there and donate.

I wrote about my experience at Akron Children's Hospital last year, and I can attest to the amazing individuals who work there, providing the highest level of care.  I will always have a soft spot in my heart for that place. 

Thursday, August 9, 2012

A Special Not-Back-To-School Project

So, a few weeks ago, on a whim, I picked up this desk at an estate sale for five bucks and decided to try my hand at furniture refinishing.  It was in pretty rough shape, but it was solid and sturdy, and I had a picture in my head (inspired by Pinterest, of course) of what it could look like with a little love.

Before
After searching around a bit on Pinterest, I decided to try the Rustoleum Furniture Transformations Kit, which I purchased at Home Depot for $34.98.  It comes with everything pictured below:  instructions, stir sticks (one is not pictured; there were three), deglosser (cleaner) with scrubber pad, bond coat, glaze coat and glazing cloths, and clear finishing coat.


The bond coat can be tinted to any of the following colors.  I asked Monkey what color he'd like his desk to be and he immediately responded, "Green!" (his favorite color).  As you can see there is only one green choice so we went with that.


The first step was to scrub it with the deglossing cleaner.  (I didn't take any pictures of that step because it was not interesting enough to merit photos.)  Next, I let Monkey help with the first coat of paint, although the perfectionist in me insisted on doing the rest myself.  He really enjoyed this part, and I'm glad I relaxed and let him do it.


How it looked after the first coat was done.  I applied a second coat later.

The next step was the glaze coat.  I was nervous about it, but it was actually pretty easy and I thought it really added dimension to the color.  I didn't glaze the insides of the side panels or drawer faces because I was planning to paint them a different color.

After glazing.

Next I added some dark blue to the side panels and drawer faces for a nice contrast. I had planned to use a dark blue and then I remembered I had some left over from a project I did about 2 years ago and it was exactly what I had in mind.  So no need to buy more paint - yay!  Note:  I did not glaze the blue parts because that paint was high-gloss and I didn't think the glaze would adhere to it properly.


Finally, I painted on the protective clear topcoat, let it dry overnight, and first thing the next morning we reinstalled the drawers and handles.  I had thought about getting new handles, but came up with a cheaper solution:  I lucked out and found a spray paint that was super duper close to the green paint on the desk and sprayed the old handles with it.


Oh, and here's a crazy coincidence:  the very same day I brought home this impulse buy, a friend showed up with an old school desk chair, saying "Here, I found this & thought you might be able to use it."  I taped off the wooden parts and let Monkey go to town on it with the spray paint I used for the drawer handles.  He REALLY enjoyed that part - sorry I didn't get any pics of him in action doing that.  


So, there you go!  I am very happy with how the whole thing turned out and I would definitely recommend this kit to anyone.  It was easy for a beginner like me and I think the finish looks very professional.  Next I'm going to be keeping my eye out for a couple of captain's beds and maybe a dresser for the boys... I'm itching to do more!

Once again, a before and after comparison:

Before

After